The world of web design has been transformed in recent years with the emergence of new digital tools that make the design process more efficient, collaborative, and intuitive. One of the most popular and powerful tools for designing websites is Figma, a cloud-based design platform that allows designers to create, share, and collaborate on designs in real-time. Here are ten reasons why Figma is the ultimate tool for your next website project. As a web designer, you know that creating a website from scratch can be a daunting task. There are multiple aspects to consider, such as wireframes, visual designs, interactive prototypes, and animations. Figma is an all-in-one tool that can help you manage all these aspects with ease and create a website that not only looks great but performs efficiently. Here are ten reasons why you should consider using Figma for your next website project. 1. Figma is an all-in-one tool for web design. Figma offers a comprehensive suite of design tool...

The best practise while designing our WordPress
website is to design it on a virtual web server (for example XAMPP or WAMPP),
which eases our task of building and customizing the website from the backend
directly. Since every edit requires saving and refreshing, developing a WordPress
site on a live server can easily become a mess once we exceed the allocated
bandwidth and run out-of-space.
For this reason, most developers rightly choose
to do all of WordPress development on a local server and later upload the final
website to the live server.
Today, you will learn the process of migrating a WordPress
website from a local server to a live server. This process is quite safer way
to move all of your site’s content (images, posts, and pages) as well as themes
and plugins from a directory on your computer to your host’s production server.
Sometimes we might face few challenges, but it’s always good to learn the
manual process.
Pre-Requirements :
- A fully-functional website running on your local machine (Desktop)
- Domain Name
- Web Hosting Space
- Database (for Example – MySql, phpmyadmin)
- FTP details of your domain
Let’s begin the step-by-step process of migration:
Step 1: Export Database File
Start your local server – Apache and MySQL Services


Navigate to phpMyAdmin—just type
http://localhost/phpmyadmin into the browser’s address bar. I’m using XAMPP and
here is what my phpMyAdmin interface looks like:


Step : 1 – Select your database
Step : 2 – Hit the Export button


Click the “Go” button to download the SQL File.


The downloaded file will be saved as “pd_academy.sql”.
Step 2: Modify File Paths in .sql file of Localhost
When designing a local WordPress website, all your URLs will be available as absolute paths. In short term, all links to your content files (posts, images, post types) will start with http://localhost/. We have to modify this link structure for your live installation or your content will not display properly after uploading the database file.To do that, I use a code editor to perform a “find and replace” on the database file you just exported. I’m using Adobe Dreamweaver and I’m going to search and replace for “http://localhost/pd_academy” and replace it with “http://www.pdacademy.com”.

I am directly uploading the wordpress files on my web hosting account under “public_html” directory. If you are going to install in under any directory then you must create a directory under the “public_html” directly at the root, so your replacement URL should be http:// www.pdacademy.com/pd_academy. You will be uploading your local WordPress folders to public_html (the root of your hosting account).

Step 3: Create New Database on Your Web Hosting Account
Now you’re done with the main part on the local server. It’s time to setup the live environment and finally get the files uploaded so that your website can go live. To setup a new database for your WordPress site, login to cPanel and browse to MySQL Database Wizard.
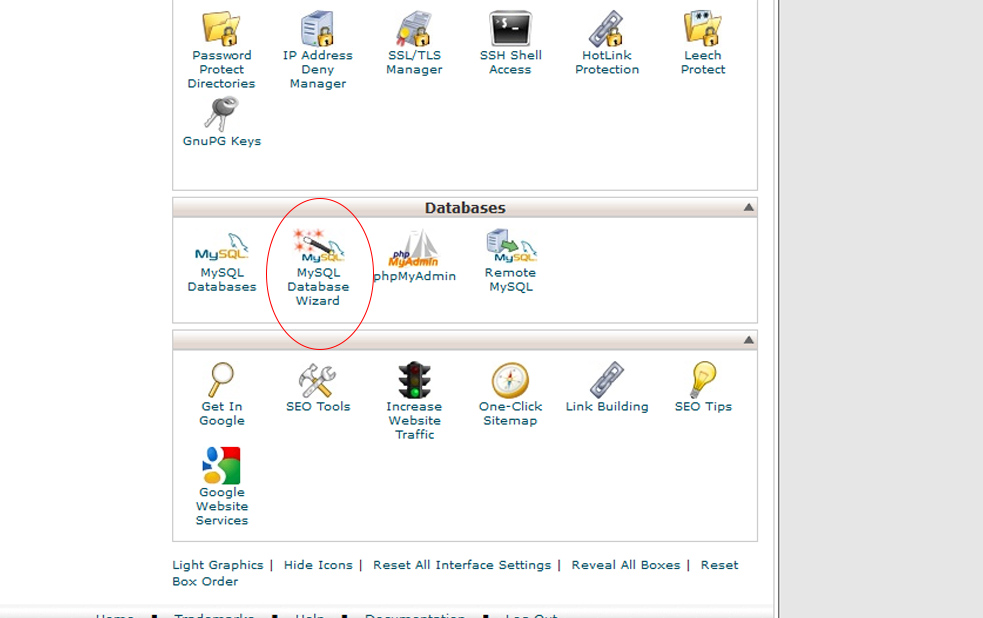
When you select MySQL Database Wizard, you will
be prompted to enter a database name and proceed further. The next screen
prompts for new user and password account that will be associated with the new
database for your website. Note the personal details like your username
and password because you’ll need them when configuring the database file in
WordPress. The newly created database will have the same name as the
username you chose.
Step 4: Upload Database File into New Database of Your hosting account
Now that you have a new (empty) database on the production server, it’s time
to upload your database file saved on your computer. Browse to the phpMyAdmin
interface of your host and select Import. Browse and choose the .sql
database file you exported from your website on the local server.

Step 5: Fix wp-config.php File
Open the wp-config.php
file in your code editor (browse to your local WordPress installation folder).
Here are the only details you need to change:
- define(‘DB_NAME’, ‘your_database_name’);
- define(‘DB_USER’, ‘your_database_user’);
- define(‘DB_PASSWORD’, ‘your_database_password’);
- define(‘DB_HOST’, ‘localhost’);
Just fill
in the settings you defined while creating the database on your live server in
Step 3. For the host name, fill in the server IP address or leave it as localhost
if your host explicitly says so. I’ll leave mine as localhost as it’s clearly
stated here: “To connect to this database in a script running on your web
server you should use “localhost” as the hostname.” When you’re done
editing the settings, save and close the file. Don’t change anything else.
Note:
Make sure to keep a copy of your old values, just in case anything goes
wrong you can restore back.
Step 6: Uploading Website Files
It’s now time to move the actual WordPress website files as we’ve setup everything on the live server. Fire up your FTP client and connect to your hosting account using your FTP connection details. You can get them from your host if you don’t have them already. For some hosting providers, the FTP logins are the same as the cPanel details.Once you’re connected, browse to the public_html or www folder (or a folder at the root where you want to install your WordPress website) and copy all files from your WordPress installation folder on the local server to this directory on the live server.
Step 7: Modify Permalinks
The final step is to modify the permalink structure of your new website to match that of your old site on the local server. To do this, go to the admin dashboard of your new website and browse to Settings > Permalinks. Select the structure you used for your local installation and save. Your WordPress website should now be live.
http://www.pdacademy.com on the live
domain.
Note: http://www.pdacademy.com is just a demo
domain. No such live domain exists and the owner of this blog never owned this
website.
User discretion : Once
the above steps are completed all your posts and pages will be remain visible
but if you have some customized theme then sometimes you are required to do some
changes for HomePage layout. But this happens occasionally.
That’s all for now
folks. If you have any queries, kindly ping me on my email akakmisra@gmail.com.